
In this Guide to Create a Successful Blog, we’ll cover choosing a topic and creating content that sells, where to host your blog for the best results, and how to use keywords and social media to drive traffic to your site, so you can have the results you’re looking for your web.
All the examples provided here will be based on WordPress as it is Scalater CMS’s preferred tool and the most popular on the market. We’ll discuss what plugins are the most effective to use. The essential tools, such as Google Analytics—which helps you track and monitor the performance of your blog—will also be reviewed in detail.
Blogs are a great marketing strategy that businesses can use to reach more customers, tell their stories, and attract attention. A blog is also one of the best ways to generate “organic” traffic. An additional benefit is that it can help build trust and authority for your brand. Also, a blog can be a powerful lead generation tool. But, before you jump right into blogging without any experience, first, you need to know the steps to creating a successful blog. We’ll go over which type of content works best and why this is important.
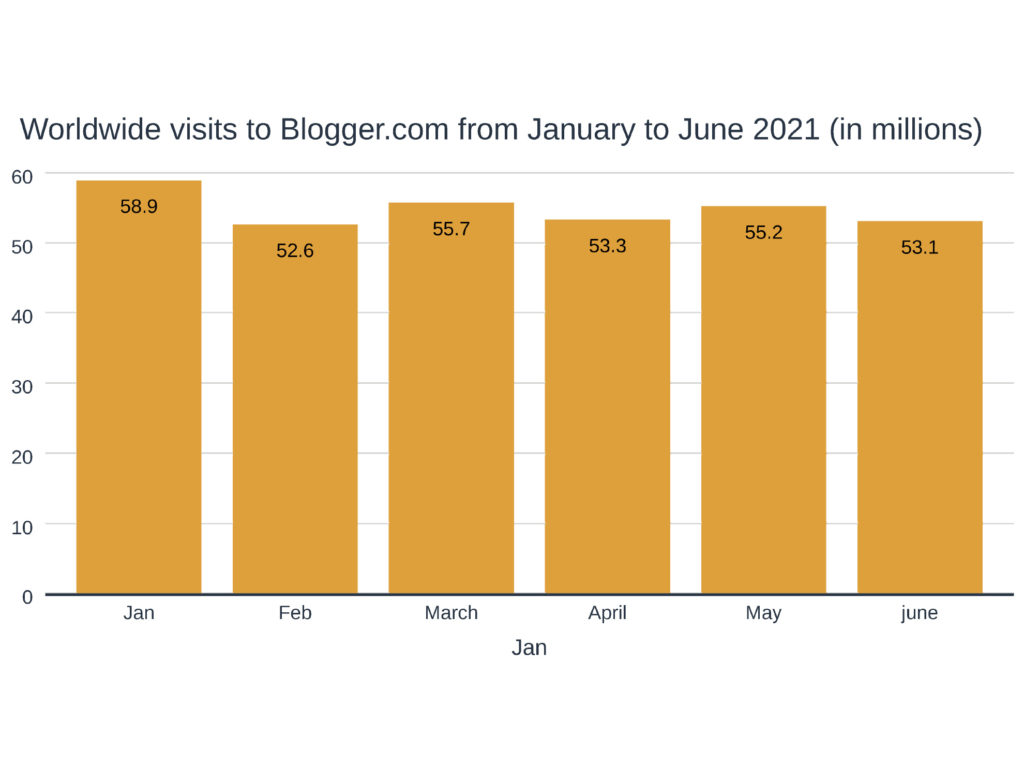
For illustrative purposes, we added this chart showcasing the number of visits the CMS blogger.com, so we can take the temperature of what we’re talking about. From statista.com.
Did you know that over 77% of internet users read blogs? This is why the blog has become an essential part of successful online marketing. Blogs are helpful to let your potential customers know about your business. But there is a big question that numerous businessmen ask: how to create an efficient blog? With that question in mind, we have summed up the steps of creating a blog:
- Setup
- Audience
- Content
- Workflow
Share As of last year, 57 million American adults read blogs. With so many splashing around in the blogosphere, it can be hard to stay afloat — especially if you want to stand out among the crowd. This eye-opening guide is filled with real-world advice on creating a blog that attracts an ever-expanding audience.

Setup Your Blog
The setup process is essential and the foundation of any successful blog. It lays the foundation for how your blog will operate and determines how easy or difficult it is to manage, and in this guide to create a successful blog we’ll tell you how.
There is a lot of software available for blogging, and each has pros and cons. You can even write your own blogging software if comfortable with software development.
You should also think about whether you want to host your blog or pay someone else to host it for you. Self-hosting will give you more control over the site’s structure, but it’s also more work and requires more technical knowledge than paying someone else to host it for you, but we’ll talk more about that later.
Pick a blog name.
The best time to do this while creating your blog is during the setup process. As part of setting up your blog, there will be a place where you can purchase domain names that are related to your blog topic (if you don’t already have a domain).
Picking a blog name isn’t the most straightforward task. There are thousands of blogs out there, and each URL structure is different from the next. If you’re planning to create a successful blog, it’s crucial to pick a name that will stand out in the big sea of other blogs.
Choosing the right name for a blog is essential. It will be your identity on the Internet, and people will refer to it when talking about you and your topic.
When you think of the name for your blog, I want to give you some tips.
- Make sure it’s easy to spell
- Make sure it’s relevant to what you’re writing about or selling.
- Your blog name should give readers an idea of what they can expect from your blog.
- It can also be related to your company (for example: “The [Company Name] Blog”).
However, it’s essential to make sure that the name is unique so that people don’t mistake it for another company’s blog.
To check if the name is unique, use a tool like Domain Hunter Gatherer. This tool will show you if any available domains match the keyword you want to use. For example, if I’m trying to find a good name for a New York-based food blog called “The Hungry New Yorker,” I’ll enter this keyword into Domain Hunter Gatherer’s search box: Once I see what domain names are available, I’ll be able to decide which one best fits my needs.
Pick a Domain Name
You’ll need to pick a domain name for your blog, no matter which service you use. Your domain name will serve as the online address or URL people type in their browsers to visit your website. For example, the domain name of this website is https://www.makeawebsitehub.com/.
The best domains are short, easy to remember, and straightforward. Your domain name must be unique and contain one or more keywords that people will use to search for your blog on Google. In other words, it has to be relevant, related to your business, and easy to remember. If your company has its own website, it may make sense for the blog to have its domain name or as a sub-domain of the main site (for example, if your main website is at mybusiness.com, you could have your blog at blog.mybusiness.com).
If you want to have a killer domain name, here are some tips:
Avoid using complex terms, numbers, and hyphens.
Use keywords in your domain name if possible. For example, if you’re planning to create a blog about technology, try using “tech” or “technology” in your domain name.
Research similar blogs in your niche and see what kind of domain names they use. See how they are doing it and how you can incorporate those ideas into your own blog’s domain name.
It is essential to have an appropriate top-level domain (TLD) extension (.com, .net, .org, etc.) that fits the industry in which you operate. For example, if you’re selling products online, .shop might be the best TLD for you; if you’re a non-profit organization, .ngo is probably the way to go.
Use Namecheap’s domain search tool to ensure your domain is unique and original (and hasn’t been registered by someone else yet). It will help you determine whether the domain you want is available and which others might work better for your brand. Ensure it is available as both “.com” and “.net”. If you have already decided on a good domain name but already taken as “.com”, see if it’s available as “.net”. You can also try other extensions like .org or .ws (for website).
Select a Blogging Platform
There are many blogging platforms to create your blog. Some of the most popular include WordPress, Blogger, Tumblr, and Wix.
Before choosing a blogging platform, you should answer the following questions:
- How much customization do you want? Some platforms let you add a lot of additional features.
- How much control do you want over your blog? Some platforms allow you to sell ads on your blog, while others don’t.
- What’s your budget? Most blogging platforms are free, but there are high-end options that require a monthly fee.
Generally, people prefer self-hosted blogs because they look more professional and offer greater flexibility in monetization and design. You can do this by purchasing a domain name and web hosting through a company such as Bluehost or Hostgator. This option is more expensive but will give you the most flexibility with your blog design and monetization options in the future.
You can also create self-hosted blogs using platforms such as WordPress (either through their site or a self-hosted WordPress site).
The main difference between each platform is how much control you have over your content and how much customization you can do. For example, Tumblr is a lot easier to use than
What’s your technical expertise? Some sites are more accessible to set up than others.
In my experience, WordPress is by far the best platform for bloggers, as it provides an easy-to-use interface where you can fully customize your blog to suit your needs. However, there are other good options depending on what you need from your blog.
Customize the design of your blog template
Customizing your blog’s design is a great way to put your own personal stamp on your site, but I strongly recommend using a template. That way, you can focus on writing, not on the design elements of your site.
You want to make sure that your template matches your blog’s personality. If your blog is about sports, you will not want to use a template with bright colors and cartoon characters; you would use an understated template with more earth tones.
Use a template when starting if you’re not familiar with web design. Free blogging software like WordPress or Blogger usually has several templates to choose from, so you can easily customize them for your needs.
Choose a design that’s easy for people to read and navigate through. It should also reflect the type of content you want to provide. For example, if it’s mostly text posts, choose a design that uses lots of white space and is comfortable on the eyes. If it’s primarily video material, you’ll need a more dynamic format that displays images nicely and has room for controls and other information like titles and captions.
As per the design, please do it for easy reading. Once you have several blog entries, you may wish to change the look of your site to make it easier for readers to navigate. Consider adding content to your sidebars to help readers go directly to the content they are most interested in.
Add a static page. When people come to your blog for the first time, what do you want them to see? Most new visitors will head straight for your archives or latest posts. Instead, take advantage of the static page feature and create an attention-grabbing front page that introduces visitors to who you are and what you blog about.
Add “Share This” buttons. If you are going to be sharing your blog on social media sites such as Facebook and Twitter, add buttons that make it easy for people to share posts with their friends and followers. Your readers will appreciate the ease of sharing, and you will likely see more visitors than you had before offering these buttons.

Add the essential pages to your blog.
There are a few essential pages you need to add to your blog, and they are:
About Page (Your bio)
The about page is a powerful way to convert casual visitors into subscribers and customers.
The About page isn’t just a web page where you talk about yourself. It’s a vital sales tool that can significantly impact your bottom line, especially when you know how to craft the perfect one.
Here are three steps you can follow to have a nice About page:
Step 1: Introduce Yourself
When you start writing your About page, you need to think about what it will look like and where it will go. Will it be a separate page on your website, or will it be integrated into your blog’s sidebar?
Step 2: Tell Your Story
Use your headline and subheader to tell people who you are and why they should care about what you have to say.
Step 3: Detail What You Do
Use this section to describe what you do, who your audience is, and how you help them. You could talk about the problems your readers face and how your product or services solve those problems for them. Be as specific as you can, with many examples of what they can expect from working with you.
But the most important thing is to be yourself!
Contact Page (How readers can reach you)
Creating a contact page is a must. Readers always have questions or comments. A contact page is the best way for your audience to get in touch with you. Ensure you have a contact page and make certain visitors can easily find it via the navigation bar.
There are several different ways to add a contact page to your blog.
-You can use the Contact Form 7 plugin to create a simple contact form if you’ve chosen WordPress-
Create this page to serve as the central hub for our readers, who are always looking for ways to contact us about various things.
Included things such as:
- Social media links (Facebook, Twitter, etc.)
- Contact form
- Email address
- Phone number (optional)
All these contact methods give readers multiple ways to contact you. It’s imperative to be as accessible as possible since your success depends on your community.
Legal Pages (Terms of Use, Privacy Policy, Disclaimer)
Every guide to create a successful blog should have at least some legal help.
If you are not sure whether your blog needs a Privacy Policy or Disclaimer page, I recommend reading this section about creating a legal disclaimer for your blog. The legal pages help your readers understand what is acceptable and what is not on your blog and are very helpful for the search engines. You can increase your blog’s trust level with your visitors and search engines by having them.
You don’t think about these pages until someone forces you to. As a blogger, you are probably not a legal expert but having these on your blog from the beginning is a good idea. In the worst scenario, someone could potentially sue you if they feel like your blog has damaged their reputation or business.
The legal pages should contain:
Terms of Use (or Terms and Conditions): This is where you lay out the rules for acceptable use of your website. For example, you can state that users under 18 must be supervised by an adult when using your site or that you don’t allow offensive language in your comment section.
Privacy Policy: This explains what personal information about users you collect and what you do with it. You also have to mention if/how you share this data with third parties.
Disclaimer: Here, you can state that the content on your website is for informational purposes only and that people who rely on it do so at their own risk. Once you have created your legal pages, you must add them to your blog’s footer. Using WordPress, you can use the Insert Headers and Footers plugin to add these pages to your blog’s footer.
Try out an online generator for these pages to get started, and then have an attorney review them before you put them on your site.
Install the Necessary Plugins
Plugins are small software programs that you can easily add to your website without any coding knowledge. If you want to add a new feature to your website or implement specific functionality not available by default, they come in handy.
There are thousands of free and paid plugins available. They range from SEO tools, caching plugins, security plugins, image sliders, form builders, contact forms, and much more.
WordPress offers a large number of plugins, both free and premium. You can find them in their official plugin directory or via third-party websites.
The official directory lists over 59,682 free plugins, so you should be able to find exactly what you need for your blog.
Caching plugins
Caching is a significant but often overlooked part of blogging optimization. Your site is slow and prone to crashing under high traffic without caching. There are two types of caching: browser caching and page caching.
These plugins create static HTML files of your content and serve them instead of dynamic PHP files. This is much faster because PHP files need to be processed by your server before serving.
Browser Caching: Stores commonly used files on a visitor’s hard drive. The browser will load these files from the hard drive for returning visitors to your site instead of downloading them again from your server. This speeds up the viewer’s experience and reduces the strain on your server when they visit other pages on your site.
Page Caching: Stores a copy of each page to be served more quickly to returning visitors. Page caching is a great way to improve the user experience for logged-in users and anonymous visitors because it makes pages load more rapidly, even when your site is under heavy load. This reduces servers’ stress, allowing them to handle more traffic without crashing or slowing down.
Let’s take a look at some popular plugins you can use for browser and page caching.
W3 Total Cache: It works and is easy to configure (though it has many options). It also has a performance grade on its settings page, so you’ll know if you’ve configured it correctly. You can use it with or without a CDN, which is helpful if you already have one set up or plan to use one in the future.
WP Super Cache: This plugin has fewer features than W3 Total Cache, but it’s easier to use and understand. If you just need a simple caching solution that doesn’t have many configuration options, this is a good choice.
WP Rocket: WP Rocket is an easy-to-use caching plugin that is simple to install and set up. It helps to reduce your site’s load time by optimizing how it loads.
Hyper Cache: Hyper Cache is another popular plugin used to optimize websites; it’s highly customizable, which allows you to tailor its settings to your specific needs.
Security plugins
We can’t tell you how often we’ve heard something like, “I had a great idea for a blog, but I didn’t have time to figure out how to make it secure, and then my site got hacked, and everything was gone.”
We don’t think this should ever happen.
A security plugin is a software that you can get through your website’s hosting service, protecting your site against common threats. Security plugins are different from other plugins because they’re not about optimizing your SEO or adding functionality—they’re about protecting the content that makes up your site from being accessed or altered by hackers or viruses.
Security plugins are like personal bodyguards for your site: They monitor suspicious behavior, block attacks, and send alerts if anything goes wrong. The best ones will also make it easy for you to back up all the information from your site if the worst happens!
WordFence Security: Wordfence Security is another popular WordPress security plugin. It has a premium version and a free one. The main advantage of this plugin is that it scans your website for malware and other suspicious files. Besides, it blocks IPs that are known to be malicious.
WordFence Security plugin page
iThemes Security: The free version offers 30+ ways to secure and protect your website from hacks and brute-force attacks. The premium version of this plugin includes several features like two-factor authentication and scheduled malware scanning, which cost $80 per year, but it’s definitely worth the money. You can also get iThemes Security in a bundle with other iThemes products for a relatively low price, which can be helpful even if you’re not going to use every tool from the bundle.
All in One WP Security and Firewall: Is an easy to install and use WordPress plugin that adds multiple layers of security to your website. It will help you add additional security measures and protect your site against various attacks, including SQL injection, XSS, and more. This plugin has both free and premium versions.
All in One WP Security and Firewall plugin page
Form builders
The most important thing to do before getting it is to understand what features you will need, how complex your form is, how many forms you will have on your site, etc.
Some of the main features of a form builder are:
- Drag and Drop Builder
- Conditional Logic
- Email Notifications
- Form Fields (single-line text field, text area, drop-down menu, checkboxes, radio buttons)
- Save and Continue Later
- Multi-Page Forms
- Payments & Subscriptions
- Integrations (MailChimp, Google Sheets, Slack, Asana)
Plugins:
Most form builder plugins share the same characteristics so going for the most popular ones is pretty secure.
WPForms plugin: A straightforward drag & drop contact form plugin for WordPress. WPForms plugin page
Contact Form 7 plugin: Popular contact form builder plugin for creating simple contact forms. Contact Form 7 plugin page
Ninja Forms plugin: Contact Form builder with many customizable options. Ninja Forms plugin page
Visual Form Builder: Contact form builder with a user-friendly drag & drop interface. Visual Form Builder plugin page

Audience
If you try to appeal to everyone, you will appeal to no one.
The starting point to a successful blog is creating value-added content that also resonates with your target audience.
Your goal is not just to reach out to these people but also to build relationships with them over time by offering valuable information on topics that interest them most! Once you have this connection, it becomes easier for your readership base to grow organically.
The first step is defining the specific niche you want to cover on your blog. You should consider the most crucial questions: Whom are you writing for? What are they passionate about and which are their pain points? What kind of blogs are they already following and what type of content do they share on social media? Take note of these things and use them as inspiration for your own content.
Once you find the answer to these questions, it’ll be easier to know what kind of content will work and attract more readers. It’s essential to create content that speaks directly to your audience so they can associate with it better.
The best way to do this is to create a persona or an imaginary profile of your ideal reader based on market research and actual data about your existing customers. To make this fictional profile, use the following three steps:
- Establish the demographics of your readers: (age, gender, income level, and education) and their interests. You can get this information from your website analytics or by asking subscribers and customers directly.
- Create a name for this profile: Imagine your ideal reader has a name and a face. You can even take it one step further and find images that represent this person on Google or stock photography sites like iStockPhoto or Shutterstock. This will help you visualize whom you are writing for when you blog.
- Find out what inspires them: And what they care about when it comes to your topic. Answering these questions will give you greater insight into what type of content to provide on your blog, which will ultimately help you connect better with these individuals on an emotional level.
Research what works for your audience
Take some time to research your audience and their online behavior, such as how often they go online, what kinds of websites interest them, and what sites they tend to visit. This can help you narrow down how to approach your blog. For example, if you’re writing an informative blog about health, but most of your readers are teens who enjoy gaming blogs, they won’t be very interested in what you have to say.
Look into their interests, hobbies, and lifestyle. What kinds of products are they buying? Are they looking for travel destinations? Do they work out? Do they love cooking? Are there any new products or services that have caught their eye recently?
If your audience uses social media, you can also engage them there. Asking for feedback or posting polls on Facebook, for example, encourages interaction with your readers. You can also use Twitter to ask questions and get feedback from them regarding what kind of content they’d like to see on
For feedback, send out surveys asking your readers questions like: How old are you? What is your gender? What type of job do you have? How much money do you make? Where do you live? How often do you go online? What kind of websites interest you? What sites do you tend to visit?

Content
Define the topics you will write about
We can write a guide to create a successful blog without touching the content subject, of course.
If you’re passionate about something, you’re probably already writing about it on your blog—or thinking about it, at least. But if you want to grow your blog for your business, you need to define your topics, so they are clear to your readers.
First of all, what’s the focus of your business? What product or services do you offer? You should make sure this topic is explicit on your site.
You might also want to choose some sub-topics. The more specific and focused your blog is, the easier it will be for people to find it. For example, if you’re an accountant who blogs about tax tips in a general way, then imagine the difficulty for people to find your blog. On the other hand, if you were blogging about tax tips specifically for business owners in Hong Kong, that would be way easier!
As well as being specific with your topics, make sure they are relevant to the target audience that you want to attract. This will help your readers drive through your content and give them somewhere to go when they’re looking for something specific.
Once you’ve chosen topics and sub-topics, include them in a navigation menu on the top or side of each page on your site. This way, it’s easy for readers to jump around and find what they’re looking for!
Ensure the quality of your content is top-notch
Creating a successful blog is all about quality. If your content is good, more people will be willing to read it—and that’s your biggest hurdle: getting people to actually open your site and read what you have to say.
Before posting anything on your blog, make sure it is free from grammatical errors, spelling, and factual errors. Use tools like the Hemingway App to help improve the readability of your posts and Grammarly to review the grammar. You can use Google Search Console to check for broken links and other crawl errors that may affect the performance of your blog.
Here are some tips to equally improve your content for readers and search engines.
Be original: Make sure your posts are unique and valuable. If you’re going to write about something that other blogs have already covered, make sure you offer some significant insight or value that really differentiates your content from the rest of the pack.
Get personal: The best blogs are ones where readers feel like they know and connect with the author. Don’t be afraid to show your personality! When it comes to writing, authenticity is vital.
Keep it simple: Overly complex writing is usually hard to read and will turn people away from your blog before they even get started. Keep things as straightforward as possible while still saying what you intend to say.
Research the topic: Research what you want to write about, and use what you learn to make sure your content is valuable and compelling to your readers.
Go beyond text in your posts: Try adding photos, videos, and sound clips—whatever makes sense for the subject of your post—to help spice up your content and give your readers more ways to connect with what you have to say. Include images or videos throughout the post: This helps break up text and keeps people engaged as they scroll down the page.
Don’t forget about SEO: make sure to include keywords naturally in your content so you can rank high on Google!
Be consistent: With the formatting in your posts, readers can quickly learn where to find the information they need in every article. Also, be compatible with topics that interest you so that you don’t burn out on a subject before you get to share all of your ideas.
Have a point: Make sure your writing has a point! It’s easy to ramble on and on when writing a blog post, but it’s essential to make sure each sentence has a purpose. Don’t waste your readers’ time with unnecessary information.
- Outline your post, and stick to it!
- Choose exciting and catchy titles for your posts that will grab readers’ attention and entice them to read more. This is key to getting more clicks on your article and ensuring it appears in search engines.
- Take time to proofread your writing, and enlist the help of an editor if possible. Readers will not take you seriously if they find errors in your work.
- Use headings and subheadings. This will help readers find what they’re looking for quickly, so they won’t feel overwhelmed by long paragraphs.
- If you’re going to quote someone within your post, cite the source properly so that the reader knows where you got the info from initially.
Make sure you organize your content adequately so it’s easily accessible.
Categories Page (To categorize posts)
Categories and tags are two of the essential tools WordPress gives you to help organize your blog. In this post, we’ll walk you through setting up categories for your blog and then create a page dedicated to displaying your categories.
Categories give you a way to organize your blog posts into groups. You can have as many categories as you like, and each category can have as many posts as you like. When you create a category, WordPress will automatically create a page within your site that displays all of the posts that fall within that category.
Your categories should be descriptive enough to give readers an idea of the type of post they will read when they click on them. For example, “Recipes” is too vague. Better options would be “Vegan Recipes” or “Dessert Recipes.” The name of your category (for example, “Furniture” or “Design”) – is what visitors to your site will see when they’re browsing through categories on your site. The Slug – this is what WordPress uses.
Tags Page (Also called labels)
If you have multiple subcategories within your larger category, your labels page is where they’ll live. This page makes it easier for your readers to get precisely what they’re looking for without clicking through several pages.
Labels pages are beneficial if you have multiple subcategories within your larger category. For example, if you’re blogging about food, you might have a “Vegan” label and an “Entrées” label. If someone clicks on the “Vegan” label, they’ll see all the posts you’ve marked with that label (e.g., vegan recipes), but if they click on “Entrées,” they’ll be taken to a page with all your entrée recipes (both vegan and non-vegan).
On some platforms, it’s easy to create labels pages – all you have to do is click a button. Others require a little more work from the get-go. Either way, this added organization makes navigating your blog much easier for readers once it’s set up.
Search Engine Optimization
You need to get the attention of search engines, and SEO plugins help you with that. SEO plugins are many tools that bring all the vital information to one place, allowing you to see how search engines see your website. They can help optimize posts and pages, content creation, keyword research, add metadata, social share images, and more.
You’ll also need analytics in your blog. You need to know how many people visit your blog, get there, and what they’re doing when they arrive. Google Analytics is the most popular tool for this, and it will tell you everything you want to know about your visitors.
Remember always to check your Analytics!
Top SEO Plugins for WordPress
SEMRush: This is one of the most popular SEO plugins available for WordPress websites. It offers a variety of features, including good keyword research, SERP score metrics, organic traffic insights, and full content audit capabilities. It’s also one of the few plugins that rank below the fold keywords—keywords that appear lower down on a search engine results page (SERP).
Yoast SEO plugin: Another popular option for WordPress sites. It offers many of the same features as SEMRush—including keyword recommendations and readability analysis—
has some other features like Google Analytics integration (to track how well your posts are doing) and Google Search Console integration (allows you to track backlinks).
AIO SEO plugin: This WordPress plugin makes it easy for users to optimize their search engine. It has a clean and straightforward user interface that walks you through setting up your SEO from start to finish. It also offers unique features like creating an XML sitemap and adding no-follow links to images.
SEOPress plugin: This is another excellent option for building a successful blog in WordPress. You can customize title tags and meta descriptions on each page or post, and it also allows you to add schema structured data markup for optimal performance on search engines.
It offers a variety of features, including good keyword research, SERP score metrics, organic traffic insights, and full content audit capabilities.
If you can’t write well, hire someone who can
The quality of your writing is the most critical measure of whether or not your blog will be a success, and in this guide to create a successful blog we’ll not lie making you beliave you can do everything.
Unfortunately, not everyone is a good writer. If your writing isn’t excellent, that can cost you more in the long run because your content won’t attract readers, and you’ll get fewer visitors to your site, which means you’ll generate less revenue from advertising or other sources. That also holds true when it comes to editing and proofreading. Don’t just rely on computer software’s spell checker! Make sure that you’re using proper grammar and syntax in your posts.
Here’s the secret to success: hire someone who can write well.
Many freelancers will work with you on cost even if you don’t have much money. Just make sure to ask around! You don’t want to hire an amateur and end up with a blog that isn’t amazing.
The only catch is that you’ll have to pay a decent rate for quality content — don’t expect to find anyone to craft anything worthwhile for $5 an hour. A good freelancer will cost you a minimum of $30 per hour, and maybe more, depending on your project’s level of experience and expertise.
You can find freelancers in a variety of ways:
Hiring portals: Services like Upwork and Guru allow companies to post job listings and freelancers to bid on them. Some companies use these services exclusively; others find skilled staff through the sites but then move on to direct communication for repeat work.
Personal networks: You may know a writer personally or be able to ask friends and colleagues if they know anyone suitable.
Social media: LinkedIn, Facebook, and other social platforms are good places to look for writing talent.
Content farms: These sites offer pre-written articles on various topics that you can purchase and post on your blog or site as-is or modify slightly to make it unique.

Workflow
How will you manage and keep track of the content you create, the social media posts you make, and the feedback you get? When is it time to create a new blog post? What’s your content creation process?
Most bloggers work haphazardly: they write when they feel like it and share their posts on social media all at once. They don’t have a plan for what they’re going to do, and it shows.
Here’s how to create a plan that will help you be more effective as a blogger:
Schedule your articles
Before you hit publish on your first post, take some time to get organized. Make sure that you have a content calendar to make sure that you’re publishing regular fresh content. Just think – if you have a blog post scheduled every month, that should be 12 posts in a year. It’s not as much as it sounds! And if you jot down all the ideas that come into your head when they do, there will always be something to write about when it comes to your scheduled writing day!
Install a plugin that will allow you to schedule your posts in advance to write them whenever inspiration strikes and have them published automatically at strategic times. Try out WP Scheduled Posts (for WordPress) or Schedule Posts for Blogger (for Blogger). You can also use Buffer, Hootsuite, or any other scheduling tool.
Social media planning
When do your followers tend to be online? Use this information to determine the best times and days of the week to publish blog posts and share them on social media. If most of your followers are in North America, publishing every day at 5 pm Pacific Time.
Decide on the frequency of posts and stick to it! Remember that consistency can lead to more readership as they know when they can expect new content from you. Make sure the frequency aligns with what’s realistic. Otherwise, it can be overwhelming and lead to burnout.
Apps to write and schedule your content
Confluence: Confluence is a platform that combines collaboration, communication, and content creation in one place. You can use it to organize notes and ideas, create drafts of new posts and share them with others so they can provide feedback or contribute their thoughts.
Canva: Canva is an easy-to-use visual design tool that’s great for creating images for social media, infographics, or other visuals that need to accompany your blog post. They offer thousands of templates in different sizes, so you have to choose one from their library or create your own from scratch.
Hootsuite: is a great way to promote your blog posts on social media. If you want to schedule a tweet or Facebook status update, click the relevant icon at the top of the dashboard and enter the URL of your blog post in the “Write a message” box. Then click on the calendar icon and choose a date and time for your post. If you want to add an image, just click on the camera icon, upload an image from your computer and choose where you want it to appear in your post. To add other social media accounts, just click on their icons on the left-hand side of the screen and follow the instructions.

Share and care
Use social media to share your posts and generate interactions with readers.
Share your posts on social media, especially on Facebook and Instagram. Tag relevant pages and hashtags that will help you reach more people. Also, use these platforms to interact with your readers and build relationships with them.
Be responsive to reader comments and questions.
Once your reader base grows, the messages will start to pile up. To have a great relationship with your readers, you need to answer all or almost all of the messages you receive. There are plugins to help you manage your customer relationships, like HubSpot.
Takeaway
Good content and an attractive presentation are two keys to a successful blog. This doesn’t mean you have to be Shakespeare or Picasso, but it does mean that you will want to invest the time and energy into crafting high-quality posts that your audience will truly enjoy reading. Remember, though, that your business needs to perform at its best if you want your blogging efforts to succeed. This means you’ll need to post on a regular schedule (at least twice a week), continue to build backlinks, update all social media platforms consistently, drive traffic back to your blog (but not over-do it), and create a lead generation machine out of it through well-placed calls-to-action throughout.
We hope you’ve enjoyed this Guide to Create a Successful Blog and that you’ve learned from it.
Stay tuned for our next piece about Web Optimization, coming next week!
Here the link to the previous article in the Web Optimization’s saga: A Practical Guide to Managing SEO on Your Website or E-commerce.
We’ll see you then
Bye to everyone!